Dive into the basics of Docker and learn how to create a self-contained, shareable development environment with containers, images, Dockerfiles, and volumes.
Image credit: What is Docker
Here’s the notes of Try Docker.
I recommend you click the link and enjoy the vivid course (with video lessons, coding challenges, and screencasts). Read this notes if you want to go through the course quickly or refer back to the keypoints.
Images credit: slide of Try Docker.
Containers & Images
Learn how to use images to create Docker containers.
Concepts
Linux containers
Linux containers are a way to create isolated environments that can run code while sharing a single operating system.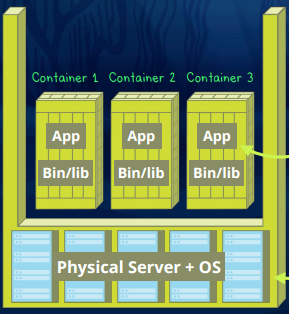
Containers will live on top of that base operating system and they can have their own code dependencies and application code inside of them, but each one of those containers will be completely isolated from any of the other ones that are running.
These containers have their own file system and useful parts of the operating system that you can customize and control while still sharing the largest parts of the operating system with your host. That means the conatiners are really small and therefore really fast.
Why Docker?
Docker is a tool that makes it much easier to manage Linux containers.
That said, creating Linux containers isn’t easy and requires a lot of specialized knowledge of Unix operating systems, and that’s where Docker comes in.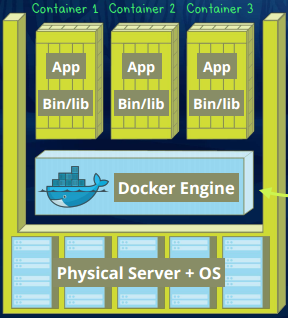
How Can Docker Help Me?
- Developers
- Create contained, controlled dev environment (Here we focus on this point)
- Share identical dev environment across team (creating a reproducible environment)
- Bug reporting (isolating the state of an application)
- IT Ops
- Testing
- Deployment
Containers & Images
An image is a blueprint for creating a container.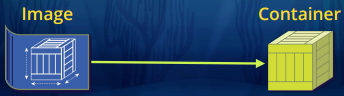
Containers are this light weight isolated section of a Linux operating system that can be filled up with code, like libraries and application code. Well images are prepackaged sets of instructions, kind of like blueprints, that can be used to build and run containers.
The reason images are so useful is that you can create a custom container and save the state of it as an image that can then be used to recreate the container exactly as described. You can even share images with other developers so that you can easily recreate an exact development across multiple people and computers on your team.
Docker publishes a bunch of pre-built images in the Docker Store and by default that’s where Docker will look when you try to start a new container based on one of those images.
Commands
Running a Container
To start running a container, type docker container run followed by the name of the image used to make the container, then a colon : followed by the version number of the image used to make the container.
This container is the bare minimum OS plus the Apache webserver.
|
|
Mapping Ports
To access the default index.html page on that server by visiting http://localhost:80/index.html: Adding a -p flag with some port numbers after it to the run command.
- The
-pmeans “publish ports”. - The first number is the port on the host we want to open up.
- The second number is the port in the container we want to map it to.
- Port
80is a standard port for handling web requests
|
|
Accessing a Container
Each container gets a unique ID, and Docker also assigns them a random name. You can use either the container ID or the container name whenever you’re running a command that needs you to specify a container.
|
|
The docker container exec command lets us run commands against a running container.
|
|
Attaching a Shell to a Container
Attach a shell to those containers and browse them just like they were a full operating system — which they kind of are.
- The
-iand-tflags can be passed to theexeccommand to keep an interactive shell open. - Specify the shell you want to attach after the container ID. Here we’ll attach a standard Bash shell.
|
|
Now we’re just navigating a normal Unix system, so any commands we type will run inside of that system. So we can use that same command du -mh we just ran with exec from inside the container.
Installing Things in Containers
Install new programs, or packages, that aren’t part of the base image.
Let’s install the fortunes package.
|
|
If we see a random fortune displayed then we know the installation worked!
Update the ENV in a Container
Update the PATH environment variable in the container so that we don’t have to type /usr/games/ before the fortune command anymore.
|
|
Dockerfiles
Use Dockerfiles to configure images in a centralized and repeatable way.
Concepts
A Dockerfile is a specially formatted text file where you can add a list of instructions that will run and result in a new image that can be used to make a container.
Creating containers from the command line works, but it quickly gets a little clunky the more customization that you need to do.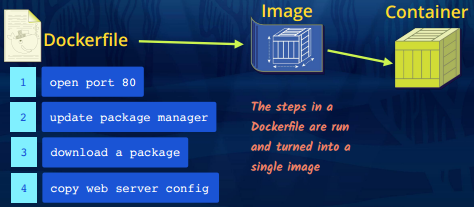
Commands
Customize Dockerfile
Use a Dockerfile to customize a base image before creating a container.
|
|
- Line 1: The first line of a Dockerfile is usually the
FROMkeyword followed a base image name. Every other instruction in the Dockerfile following theFROMinstruction will create a new image that blends together everything in the base plus the modifications we’re making in the rest of the Dockerfile. - Line 2: Next, we can use the Dockerfile to expose a port inside of its associated container. Note that we’ll still need to map ports between the host and container when we run
docker container run, but this line will let the image know which ports inside of the container should become available. - Line 3: Remember how in the last level we had to
docker container execto installfortunes? Well, with a Dockerfile we can run any commands as the image is being built with theRUNcommand. Line 3 is a combination of
|
|
- Line 4: Since we can distribute Dockerfiles to other developers, it’s a good idea to put our contact information in them with the
LABELinstruction.LABELaccepts key-value pairs in the form ofkey="value".
Building an Image From a Dockerfile
Use that Dockerfile to build a new image with the docker image build command. The --tag command is a useful option to pass to docker build that lets us specify the name of our new image followed by a version number.
Note: End the command with a single . so it knows to look for the Dockerfile in the same folder that the command is run in.
|
|
Get a list of all images on the computer. In this list, we’ll see our newly created web-server image.
|
|
Running a Container From a Custom Image
Now we can create a container with the new web-server image.
- Uses the
web-serverversion1.0image - Maps port
80on the host to80on the container.
|
|
Volumes
Take control of the data in your containers with volumes.
Concepts
If the image you’re building a container with doesn’t already contain application files, you’ll need an extra step to get them into your container.
- Copy a file into a container from the command line
- Copy a file into an image with instructions in a Dockerfile
Now if you’re already got the files then including them in the container from the start works fine, but what about files that aren’t created yet or files that are going to change after the container’s already been started? The problem with just copying files in is the containers won’t persist data.
As soon as you stop that container from running, all of the data inside of it is gone too and won’t be there when you start it up again.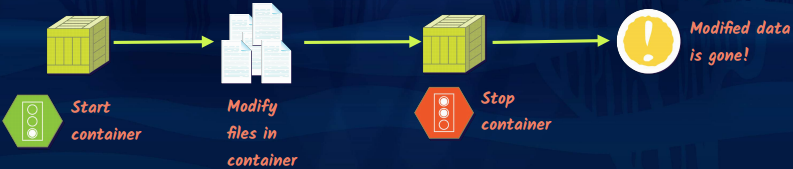
One way to fix this problem is to use a data volume to create a connection between files on our local computer (host) and the filesystem in the container.
Data volumes expose files on your host machine to the container.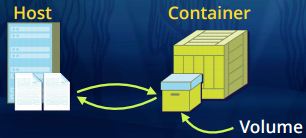
That way whenever you stop the container, you can still access that data from inside the container when you start it up again. This is a great option for local development when you want a container to have access to files that you’re working in and that are actively changing.
Commands
Copying Files into a Running Container
Here, we’ve got a container that’s already running with the name elegant_noether.
|
|
Notice the order that the commands must be written: First, the path to the file on your host machine, then the container’s ID followed by a colon, then the path to the file in the container.
Copying Files Through Dockerfile Instructions
|
|
Creating a Volume
|
|
- Line 1: Create a link between the folder
/my-fileson your host machine and thehtdocsfolder in the container. This also runs the container in the background. - Line 3: Get a shell in the container
- Line 5: This will show us that the container thinks those files on our local machine are inside of it. we’ve created a volume that’s linking those local files to the container!